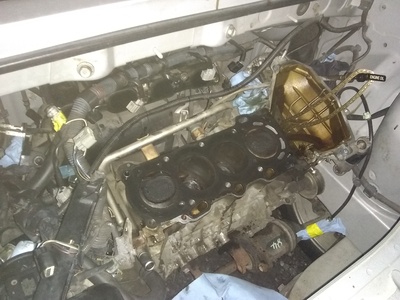
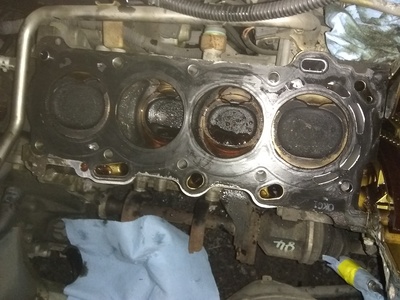
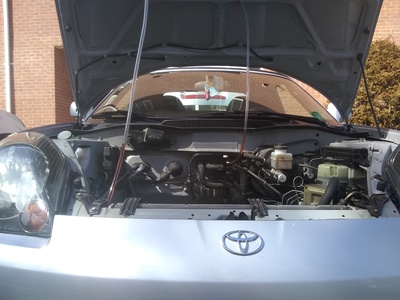
Eventually going to update this thread with pics but just wanted to share, i.e. gloat, that my spyder is no longer drinking oil like a trucker on a big gulp haha.
I was bouncing around a few ideas for a while on what I wanted to do, whether that be a 2zz swap, 1zz swap, or a rebuild, taking into account my future vision of the car. However, what eventually got me to rebuild my 1zz was one thing, TIME. I had a big trip to Florida coming up, about 2700 miles round trip, and I wasn't confident the MR2 would survive without an intervention. I was going through over a quart every 300 miles at this point, more if highway. When I drove to Chicago previously, I found it very difficult to trend the oil burning rate.
Anyways, with my trip approaching and no quality engine sourced, I decided a rebuild was the way to go! One hickup, I live in an apartment with no garage and I didn't have an engine hoist to lift the car as I dropped the engine. So, I went ahead and did it in the car with some advice from Bashman on *****chat and a nice youtube video
What I did:
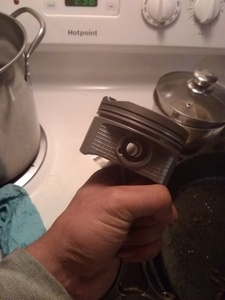
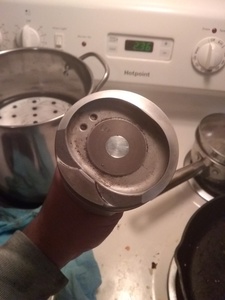
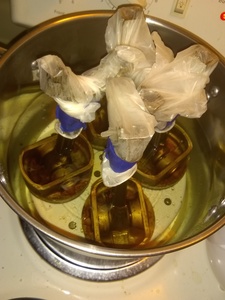
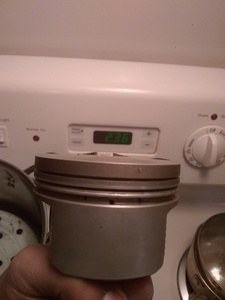
Pistons: cleaned ring landings and oil return holes, added 2 new downwards graded holes to each piston, enlarged all holes. Decarboned by boiling in water.
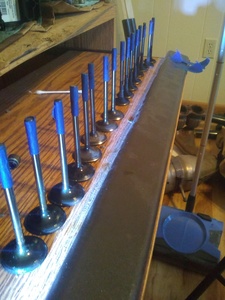
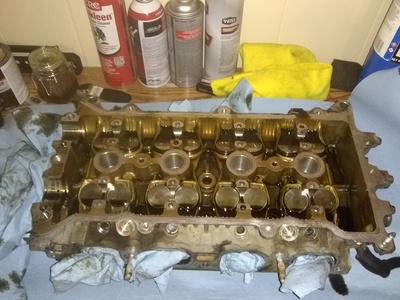
Head: Lapped Valves, Changed valve stem seals, cleaned off carbon
Short Block: Dingleberry (Ball) Honed the cylinder to provide a nice 30-45 degree cross hatch at 400 grit. This is effectively a plateau hone.
Checked tolerances on connecting rod bearings, changed out bearings with fresh ones and made sure everything was in spec. Was going to shim them all to get them on the low end of the tolerances but the new set had them all comfortably mid range with the exact same tolerance. Yay for even wear. Tolerances are lower on the spectrum than what they were and one of the bearings had bad marring from where it caught a particulate so there was that too.
Changed a bunch of gaskets.
New NPR piston rings.
For the break in I followed the break in procedure outlined by that motoman dude and used 10w30 conventional supertech from walmart. Changed oil and filter 20 and 200 miles in. Then drove ~2700 miles on my trip to Florida. About to change to penzoil platinum 5w30. Other than oil burned during the first few hundred while the rings were seating, I haven't burned any oil. The level on the dipstick had been stable for the last 2500 or so miles. And, really, significant burning only occurred during the first 200 miles, mostly first 20. Also, while before my oil would be black within 50 miles of a change, 2700 miles from my last change, my oil still looks brand new, just a little darker.
I guess the real test will be to see if any of the penzoil platinum gets burned since it's thinner.
The hardest part of doing this in the car was identifying where everything was and the tight spaces. Luckily all my wrenches are low profile or I would have had a big issue. Also, I couldn't get the ECT Sensor off with my 19mm deep socket becaust it turns out my deep socket is only 19mm for the first 3/4 of an inch and then changes internal diameter. All the ones at advanced were the same so I got a 19mm ratcheting wrench that I will never use again lol. I left the intake manifold and alternator in the bay, detached, while pulling the cylinder head. There were a bunch of crusty hoses but hot water got them off fine. Also, putting the head back on without messing up the rtv on the timing cover was difficult. Pretty sure I strained a muscle below my shoulder blade. Now feeling better 2 weeks later haha.
Also, when I first pulled the pistons I was very confused because the landings all looked very clean. However, after I pulled the rings, each one was filled solid with crud behind the rings and the oil return holes were partially occluded.
Random Coolant Fill Pic:
Very thorough! And quite a cost effective solution for those willing to put in the labor.
My first TSX engine (k24) consistently burned a quart every 800 miles or so for all 90k miles I put on it, and likely most of it's 140k life before my ownership. Once the timing chain stretched and it was also leaking oil like crazy I found it cheaper and faster to just drop a JDM engine in. After that I disassembled the old engine and found everything in spec, except the oil rings were completely stuck... Kept a couple pistons for the next engine I killed (hydrolock)... May get around to bring it back to life someday...
Added pics
Excellent work. There was a another guy long ago that has also taken he same approach with reported success. I still feel that a used low millage would be better but in this case where the oil consumption is probably occlusions from varnishing deposits it should fix the problem.
Didn't know timing chains could stretch! I always just kind of assumed that they were a lifetime piece. Would have been awesome if I could have sourced a decent engine like you did with your tsx. Would have saved a lot of hassle.
I have to agree with you Dev. When thinking about all the work I had to put in, a low mileage engine with a traceable history would have been the way to go. It's much easier to swap an engine than to rebuild one haha. However, my engine only had around 58k miles when I did this so there's that too. Really though, I could have put some more effort into sourcing an engine. I was just kind of itching to crack this one open for fun. It ended up having a decent mix of type 2 fun though. Mainly because I only had a few days to complete the work haha. One good thing that came from opening my engine is that I am fully aware of it's current condition.
Actually in many ways as a enthusiast you did the right thing because you have gained a great deal of experience and knowledge.
Most of all these kind of challenges are what makes owning and sharing a real treat for everyone.
Its interesting to note that what they found that makes timing chains stretch is inadequate lubrication. This is why synthetic oil needs to be used in these cars that use VVT systems like ours that drain their oil to splash on the chain should be free of deposits.
Inspirational - Didn't think 'in vehicle' head work was an option. I have a 2zz with a blown head gasket - maybe I need to rethink my strategy about fixing it.
Nice work
Makes sense. Did a little reading up and i'm now under the impression that chain's don't really "stretch" as much as they get slop due to cogs and push surfaces on the links wearing against each other and opening up tolerances. Guess that could eventually lead to a jump. When the oil is gritty or out of spec I guess it could make this wearing accelerate.
Thanks! Now that I've done it once, I'm confident I could do it way faster. I'd still rather drop the engine though just because it get's a little frusturating with all the tight spaces.
Here's the video I watched: https://m.youtube.com/watch?v=A595LR4SQpI
It's a 1ZZ in a corolla which has the engine mounted differently but it is still more or less the same. I'd suggest using the video in tandem with the TIS pages for the spyder because there are a few critical differences (sensors that must be removed or they will break when pulling the head)
Also, there wasn't clearance to remove the stud holding the belt tensioner piston to the cylinder head due to the strut tower so I had to remove the supppperrr tight bolt that holds the tensioner to the shortblock and disconnect the piston from the arm, leaving it connected to the cylinder head.
Edit: Saw you said 2zz so you'd want to use the TIS pages for the car you sourced the engine from, though I don't see it being very different
Makes sense. Did a little reading up and i'm now under the impression that chain's don't really "stretch" as much as they get slop due to cogs and push surfaces on the links wearing against each other and opening up tolerances. Guess that could eventually lead to a jump. When the oil is gritty or out of spec I guess it could make this wearing accelerate.
Maybe not so much grit but the lack of flow due to deposits in the small VVT circuit, actually the entire VVT system. That is an interesting take on stretch as it might not be the actual body of the link but the link pins losing their tolerance making the chain larger as a result. You see this with motorcycles also which requires periodic adjustment at least from what I remember.
From what I read these chains depending on the application of course can last hundreds of thousands of miles or the end cycle of the engine.
@dev Did you know that most chain manufacturers pre-stretch timing chains as the final step in manufacture? This tends to keep the in-service stretch minimal. As others have pointed out, most of the in-service "stretch" is actually chain and sprocket wear. The only problem with chain stretch is the effect on cam timing. The chain tensioner should keep the chain properly tensioned even with abnormal wear. when deciding if the chain is in need of replacement, the shop manual will show you how to properly measure the chain for wear.
The timing chain manufacturers spend a lot of effort on material science and surface finishing aspects of timing drive systems. Chains in engines are not low-tech! That is why you should not buy bargain replacement timing chains and sprockets.
I did not know that but it makes sense probably to limit the rate of initial stretch to keep it stable afterwards for the long haul.
I read somewhere because of better materials and engineering these chains or metal belts made CVT transmission more mainstream for fuel efficiency and at the same time have adequate reliability.
While working with folks in the oil/lubrication business I learned how much R7D they put into combustion by-products from oil as these tiny parts find there way into all sorts of places they shouldn't be - including...timing chain wear issues. I would have never put them together, but their explanation was pretty detailed. This was work on high ethanol blend content, but surely highlights the possibilities. Rule of thumb - use good oil and change at good interval.
There were a few owners I recall that had inherited severely varnished engines which chattered loudly and once they gave their engines the right kind of dispersant flush (not the auto store stuff) the noise was level was significantly reduced. I have heard of others having VVT positioning codes probably due to this.
There was an owner that opened up his VVT actuator to find the little plastic wedge seals gummed up with varnish. I had an opportunity to open up my actuator in 2016 when I was doing an intake cam replacement and it was spotless, I attribute that to good quality synthetic oil that actually cleans deposits. I’m now switching to Penzoil ultra platinum which is suppose to be better then what Im currently using.
