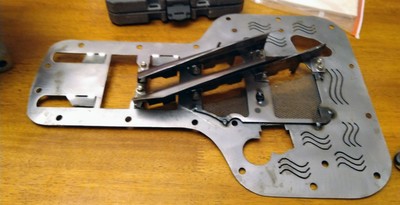
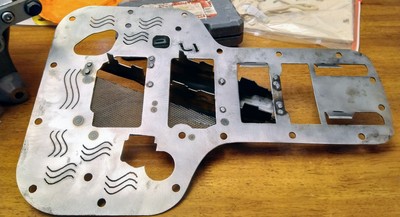
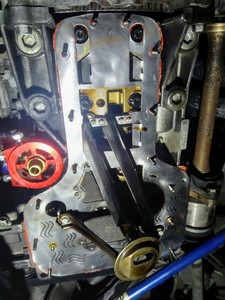
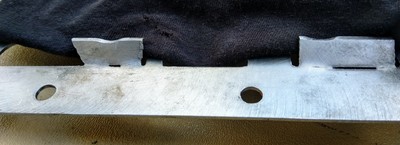
I have recently completed the install of said crank scraper and thought I would share my experience. First off, the scraper I have installed can be found here:
https://www.crank-scrapers.com/Toyota_2zz.html
I followed Dev's install walkthrough which can be found on adchat here:
https://www.spyderchat.com/threads/crank-scraper-installation.30792 /
Between the two above links won't go through an extremely detailed step by step process. I will share the highlights of my install.
(After re-reading this, holy crap did it get long. TL;DR on the bottom of post)
Be advised: the curved "vector plates" as seen in these photos are no longer the standard. The last pic on the IJ site shows the current design, which has flat plates. That pic was updated after I received my scraper with said flat plates and I inquired. Kevin was great to communicate with and happily made me another set of plates with the old design, and I swapped them out myself. If you want an older design, ask first! I am sure he will accommodate.
On that note, if anyone here is a hardcore fabricator and wants to make a scraper on the cheap, the flat plates that originally came on my scraper are available.
I chose to install the scraper because I am preparing the car for a Blitz supercharger. The blitz kit is supplied with its own oil pan, which is required due to the mounting location of the supercharger displacing the alternator. The alternator is relocated to the oil pan, along with an additional two idler pullies for belt routing to new alternator location. The supplied pan is a higher capacity than OEM, but has no baffling of any kind (the pan I removed was a Moroso) and is made of cast aluminum. No welder around me would even consider welding anything into it. After some research the IJ crank scraper and pickup tube lowering kit stood out as the best option I had to control oil flow... And hey, maybe I'd pick up a bit more power to boot!
On to the install...
Prep: Drained oil, removed Moroso pan, saran wrap the bottom end to create a pseudo curtain to help keep dust out. Let everything drain for a few days.
Test fit the scraper to the oil pan. Couldn't get all the bolt holes to line up perfect. Found a weld was rubbing the inside lip of the pan. Aluminum is softer than steel... So filed that area of the pan down an 1/8" or so. All the holes line up now.
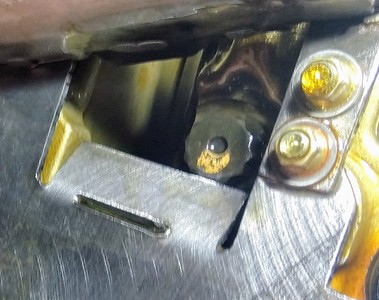
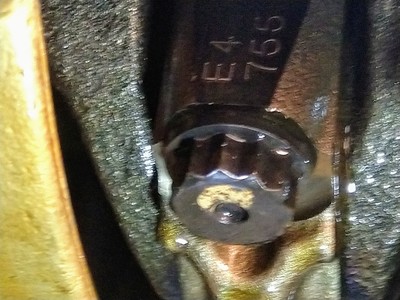
Day 1: Cleaned mating surface on engine, test fit the scraper, using all fasteners to get tightest possible fit. Removed spark plugs to make engine easier to turn. Closed up the shop to keep as much noise out as possible and turned the crank to check clearance. Be advised, when you turn the engine more oil will likely run out. No nicks, no scrapes, excellent! I noted that the bent up "tabs" in bays 3 & 4 had a very tight tolerance, I don't have feeler gauges, but my fingernail fit between the conrod bolt head and the tab.
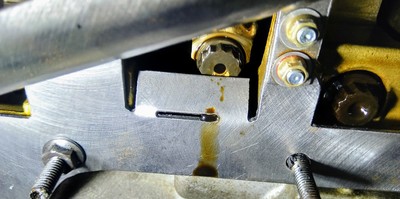
Here you can see how the scraper caught a small drop of oil off of the #4 conrod bolt.
Cleaned up the mating surface of scraper and engine block, slapped on some red RTV I had laying around and bolted everything up. Left to cure overnight.
Day 2: Rotated engine a few more times and confirmed no interactions between rotating assembly and scraper. Removed all external hardware, just leaving the 3 internal nuts (there should be 4, but one of the nuts wouldn't clear a weld for the directional screening, so I just left it off) holding the scraper on. Test fit pickup tube with 1 spacer, clay was dry so stole some of the kids play-doh. First result, 13mm off the pan floor. Added second spacer and tested again, 10mm. I am out of spacers so this will have to do. Since the pan is cast aluminum I would have no issue going down to 7-8mm, if the pan takes a big hit it won't bend, it'll just crack. Installed the pickup tube with both spacers and 3 new pickup tube gaskets, no RTV. Cleaned pan and bottom of scraper mating surfaces, RTVed, and bolted down. Left to cure overnight.
Day 3: Put spark plugs back in, checked to make sure everything was tight, added oil and fired up. TICK TICK TICK TICK TICK TICK TICK TICK TICK TICK TICK TICK! WTF?!?
Shut it down after 3 or so seconds... Look in the engine bay and see one of my mufflers touching the rear sway bar, adjust the exhaust, fire back up...
TICK TICK TICK TICK TICK TICK TICK TICK TICK Damn it all!
It's definitely coming from the bottom end. At least I know I had oil pressure. Dump the oil back out, drop the pan, see a couple of locations with nicks, one with a heat spot. Feeling so much contact is highly improbable, I refer back to all the pictures I took before and during install. Only one imperfection is new, the "scraper tab" for #3, this makes more sense.
Even though no contact was made while turning the engine by hand, it's obvious there is a small amount of play (oil needs space too I guess) in the conrod bearings, enough to change the position of the rotating assembly by at least the thickness of my fingernail.
I noted I would have to remove the oil pickup tube and risers to drop the scraper back off. Now my new pickup tube gaskets were crushed, and possibly wouldn't seal if used again. Disgusted, I left the engine to drip out some oil while I went back to the drawing board.
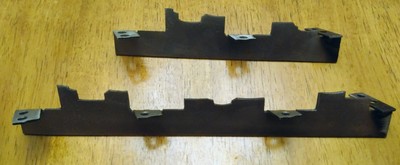
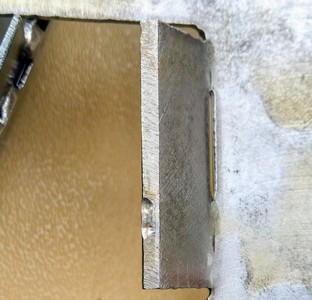
Day 4: Armed with some new knowledge and Permatex Right Stuff Black, 90 minute set (more on that later) I came back ready to get the car running in a single day. Dropped the scraper back off, documented the damage:
Got out some old rags, a couple of hand files,and went to town! After a couple of test fits I decided the #4 "scraper tab" was too close for comfort. If #3 touched at high idle with 0 load, #4 might touch when I add load... And I did NOT want to do this again. If I wanted the tightest tolerances available, I'd have spent the additional $130 with IJ and gotten the zero clerance Teflon scraper.
So #3 and #4 tab both got the file! Final product:
Cleaned religiously and test fit a final time... Good to go. Clean mating surfaces, add the Right Stuff, hand tighten, let sit an hour, torque to spec... THEN the 90 minute set started... A little misleading to claim 90 minute set on the label when it actually takes 150 minutes... But it still beats the pants off 24hours, so I'll take it. There is also a 1 minute/immediate service Right Stuff product, but I was not feeling confident in bolting the entire scraper down properly inside 5 minutes.
While the scraper is curing I installed the pickup tube and all spacers again. In leiu of buying 3 more gaskets (who knows if anyone local would have had them) I decided to use a very, very small amount of Right Stuff between each piece of the assembly. Got it on hand tight, wait an hour, torque to spec. Now the scraper should be cured... Remove all exterior bolts, clean everything up, install pan etc... 2.5hrs later... Oil filter back on and oil in pan. Fire in the hole.... And... No ticks! Have oil pressure, no weird noises and no crazy leaks! What took me 3 days the first time was accomplished in 8 hours the second time. Will definitely be keeping Right Stuff 90 and 1 minute at the ready for all future projects.
TL;DR
Install crank scraper because I had to remove my moroso pan. Scraper had great clearance when turning engine by hand. After install car goes tick tick tick... Have to remove and file down spots that cleared when engine turned by hand, but didn't clear when engine was at cold idle. All is good now. If you install a scraper and clearance is very tight... I recommend filing for additional clearance. It's worth not having to do the install twice. Kevin from Ishihara-Johnson is a great guy to work with. Permatex Right Stuff is awesome.
Good to see you opted for the original design which in my opinion keeps the oil from riding up on bays 3 and 4 as the oil is returning to the pan.
Having said that take a look a this thread.
https://www.mr2roc.org/forum/index.php?topic=68137.0
Although this guy was a little low on oil because of the discrepancy of the dipstick I believe this is not the major contributor to the engine failure. There have been others that have the Moroso oil pan with the oil gears and will still eventually take out the engine due to starvation of oil which they cant wrap their head around because the pan is supposed to prevent the uncovering of the pickup tube.
In actuality uncovering the pickup tube is not the main problem. In my opinion the problem is aeration of the oil from hitting the crank and the longer you drive the car on the track the oil will get saturated with air bubbles that don't have time to dissipate which will cause the pickup tube to suck it in reducing oil pressure to the engine.
Even the crank scraper is not enough but it is a good first start to addressing the issue. The best way to address the issue which has proven its self anecdotally and somewhat by documented oil pressure logs is the accusump.
If I were to race I would put that Moroso money into a crank scraper and an Accusump with good capacity and not have to worry about it. If I was being sponsored I would get a dry sump and also not worry about aeration of the oil.
I think the scraper is adequate for my needs at this time. Fun street car and future weekend warrior. No real tracks near me, at least none that are in my budget...
Driving impressions:
The butt Dyno is happy! The engine feels more free. Acceleration has improved and decel in gear seems to be happening slower now, less drag inside the engine. The change feels very similar to what I felt when I swapped in the OAD pulley. They compliment each other well. Torque Pro is consistently (if you can call the calculated measurements consistent) reading about 4-5whp higher than before.
Also worth noting, the higher capacity of the old moroso pan definitely does help with engine cooling. Over the past few days I have noticed the car warms up significantly faster than it did with the moroso pan. I think drain&refill with the blitz pan is ~5qts.
I think the scraper is adequate for my needs at this time. Fun street car and future weekend warrior. No real tracks near me, at least none that are in my budget...
Even without the crank scraper for the street or AutoX the 2zz will not suffer any issues as long as the oil is filled. The people that have taken out their original 1ZZ from the Spyder was not from AutoX, it was documented that the owner did not check the oil level especially in one that was burning oil which is far more important than any oil pan but for some weird reason they think having the larger sump is going to safe them on the street but in reality could actually backfire on them in a major catastrophic mishap once it gets damaged. I have dented my oil pan, it happens especially if you are lowered.
Another reason why you see failures even with the higher capacity oil pan are from those that run too thick of an oil when its not needed. Its sad that the underling issue with 2ZZ and 1ZZ failures is not the design of the sump, its the owner who is overreacting and then by a lack of knowledge creating the very issue they are trying to prevent.
Glad you got yours working. I tried to put one on my MWR 1ZZ that had ARP main studs and some other upgrades and the bolts went too low for the scraper to fit flush. This was in several locations. I was definitely saddened to know I couldn't use it. But I did make use of the modified windage tray.
Nice write-up too!
Get your Short Antennas, Decals, and all sorts of goodies at:
https://takubanmotorsports.com
That's a shame, I presume you changed the engine stroke? I believe Kevin does custom jobs too... Sends you a template which you cut to fit and return... He makes the real thing. More expensive I'm sure, but the option is still there!
That's a shame, I presume you changed the engine stroke? I believe Kevin does custom jobs too... Sends you a template which you cut to fit and return... He makes the real thing. More expensive I'm sure, but the option is still there!
True. I spoke with him on the phone and tried a few things. Ultimately, I would have had to grind out quite a bit. The pan is on the engine now and anxiously awaiting an install at some point. Hopefully, this year is the year I get the engine swapped out after having it on the stand for so long.
Get your Short Antennas, Decals, and all sorts of goodies at:
https://takubanmotorsports.com
Lord knows my story today installing a crank scraper on a stroke / APR main bolt / MR Moroso modified turbo 1ZZ. Absolute pain and ended up realizing I need to grind each point where the main bolts touch the scraper. Working away from home and not realizing that the slight failure to fully clear the bolts would result in the scraper seating fine but the oil pan not seating flat. I’ll get back to it soon, better prepared with small grinding wheel for my Dremel.
Should be relatively quick work with a dremel. I finally bought one shortly after this install... Wish I'd had it was earlier. Good luck with your install!
