I promised to make a show-n-tell thread with my home built 2GR swap spyder. I bought it (already swapped) 8 years and 120,000 miles ago from Uspspro. It has homemade engine mounts, stock exhaust manifolds, three catalytic converters, a few of Goukys parts. I drive it daily. The details may provide some helpful details or alternatives for folks planning a 2GR swap.
Short video of the cabin and instrument cluster:
Underside show and tell:
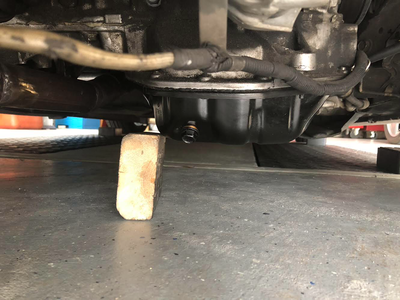
(I misspoke in the video about clearance to the oil pan. I have about 3 inches clearance)
Top side show and tell:
- Ownership impressions -
The 2GR is fantastic and very easy to live with on a daily basis. It will happily loaf at 1500rpm. I regularly roll “California stops” in second gear, with rpms dipping down below 1000rpm with no fuss. The torque curve is so flat there is no drama during acceleration. Executing a “normal speed” pass on a two lane road just needs a little throttle. For quicker stuff I downshift one gear. If the rpms are above 3000, things happen very quickly. Highway antics (80mph plus) are all managed by dropping from 5th down to 4th. Very few cars can leave me with full throttle in fourth gear. Except that Dodge Demon thing. He passed very quickly. Video coming if I can learn how to blank an incriminating road sign.
- General swap information -
I get 23 mpg on daily commutes at 80+ mph. I saw 19 mpg when I first got the car due to many wide open throttle accelerations.
Failures during the last 120,000 miles are - two coil packs, one alternator, one AC compressor and two clutches, plus a handful of odd axles. Autozone axles only last 10k miles or so. Toyota stock spyder axles last significantly longer. Overall the car has been super reliable. Down times are pretty lengthy because I won’t let anyone touch the car but me.
Quiet mufflers help avoid unwanted attention.
Overall weight is 2450 lbs with 1/2 tank of gas.
Power is somewhere around 270hp. Uspspro dyno’d it at 270 hp with three cats. But the ECU held 6200rpm redline. I now have Gouky’s tweaked ECU with 7200 rpm redline so max hp should be a little higher.
- Thoughts on a home built swap -
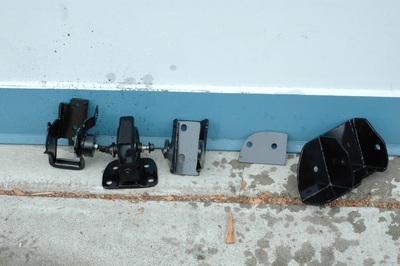
Home made engine mounts don’t look too difficult if you’re okay with steel plate, and spliced parts.
Transmission bellhousing lugs require welding dirty aluminum, far above my skill level. That would likely require a professional with a powerful Tig machine.
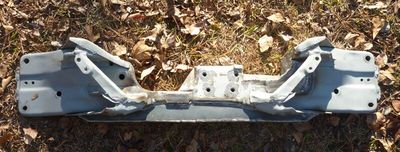
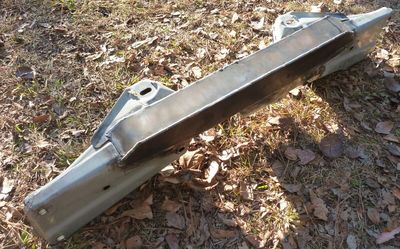
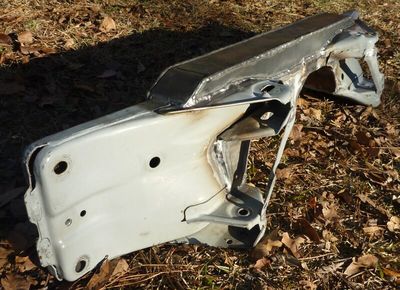
The crossmember mods are all simple to do with a 20k rpm abrasive cutter, and some .090 thick steel sheet. I fabricated the stiffening box beam on mine during one afternoon. (Three pieces trimmed to fit). Then paid a pro to weld it up for me.
Gouky’s forward mount is mandatory to grab the front of the engine (RH engine mount)
My engine position is lower and further aft than Gouky’s current 2AR engine mounts. Mine is also rotated slightly aft, where the rear bank of cylinders is lower. When I pulled the transmission, the engine wanted to rotate forward towards the firewall. Benefits of my engine location is... alternator and AC compressor can both be removed without a firewall cutout. Drawbacks of my engine location is...slightly less ground clearance to the oil pan, and slightly further aft increases polar moment of inertia for turning the car. Probably imperceptible(?). I think Paul Wood’s engine installations (in UK) are more similar to Gouky’s.
I make Amateur Armrests - see the Commercial Forum. I also have SMT repair seals available.
Modifications to accept 2GR engine:
Wiring -
Uspspro wouldn’t provide me any details on wiring changes. He did it the hard way - wire splices and pin changes on the ECU. I think there are some harness guys that will make up a swap harness but I’ve never priced them
Access door -
I cut an access door about 8x12 inches on the horizontal firewall shelf, to allow access to the coils and spark plugs. I made the door from something like .090 thick steel, with rivnuts all around the perimeter.
Hammer work -
The RH strut tower needs mild hammering to make clearance for the engine oil line (VVT supply?)
The horizontal shelf needed minor hammering to clear a sensor on the forward cylinder bank.
Crossmember -
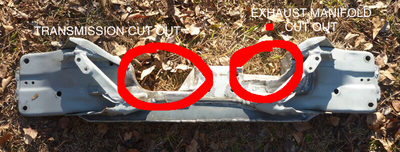
Two cuts, one to allow room for the transmission, another to clear the rear exhaust manifold. The cutouts were boxed with sheet metal and welded up. I built a rectangular box and welded onto the back of the crossmember and span the cutouts - restoring the integrity of the crossmember.
Box beam at the gas tank -
No mods. I see that Paul Woods does a half-moon cut on his swaps in UK. Cut is needed if you use Gouky’s headers. Not required with a “stock” style manifold.
Instrument Cluster -
On my garage swap, the alternator light used to glow dimly all the time. I stuffed toilet paper into the little tube behind the face to black it out. I know if the alternator isn’t charging cause the battery goes flat.
Water temperature gauge was “fixed” cave-man style on my car. I bought a “stewart warner” aftermarket analog temp gauge and installed the guts into the Spyder’s cluster. $20 total cost. I removed the digital cannister in the cluster and replaced with an analog cannister (exact same size!), pushed the spyder needle onto the new temperature sensor guts. The only trick is that Stewart Warner needle goes up for cold, down for hot. I stuck small “C” and “H” stickers on the face of the cluster to match the new needle behavior.
Obviously, Gouky’s neat circuit board negates the need for this cave-man solution. He didn’t have it for sale when I “fixed” it myself!
Overall, it requires very few un-reversible mods to the car to accept the 2GR engine. The crossmember can be unbolted of course. Not sure why anyone would want to reverse the engine swap but some folks seem interested in not modifying the stock sheetmetal.
I make Amateur Armrests - see the Commercial Forum. I also have SMT repair seals available.
Part details:
Exhaust manifolds -
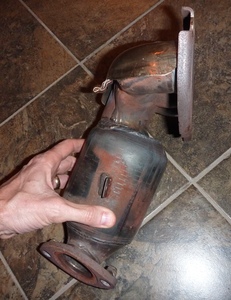
Uspspro wanted to be able to pass sniffer tests, so he used three cats. One on each manifold (integral) and one larger one downstream. He used two RH/rear Camry manifolds (2006-2011 Camry, Avalon, ES350). Toyota P/N 17140-31161. The forward manifold (in the spyder) had to be cut and re-welded to dial in the mounting flange position. The aft manifold is used as stock. I can post pics of the modified manifold if anyone needs.
Transmission -
S51 from 97 Camry 4 cylinder, 2.2 liter. “Slight” modifications to the bellhousing. Two additional lugs welded on the bottom. Notoriously a weak transmission, I’ve had very good service. I installed an LSD from a spyder, noticeably nicer to drive with LSD! The first transmission lasted about 100k miles until it shucked a few ring gear teeth. I’m on the second one now at 120k miles. I don’t do drag strip launches, and I’ve learned to shift with fingertips. One ham fisted shift bent the shift forks around 80k miles. I double clutch every 3-2 downshift. Other than that I drive it like a jerk.
Crossmember -
Notched out heavily in two places to accommodate the transmission, and the aft exhaust manifold. The beam cross section was reduced from roughly 6 inches (stock) to maybe 2 inches after notching. I found cracks as soon as I bought the car. All fixed by welding on a simple box onto the aft side of the crossmember. Photos coming later.
Oil dipstick -
I removed the “engine oil” tee handle from the dipstick by pinching it with some pliers to release the cable. Then brazed on a piece of motorcycle cluch cable to extend the dipstick cable length. Then re-attached the tee handle. I made a new dipstick tube using some scrap stainless steel spiral cable (from a Navy A-7 aircraft) and slipped in into the stock 2GR dipstick tube. A piece of heat shrink tubing keeps the spiral housing in place, and keeps crap out. The tee handle and dipstick tube outlet is bolted to the upper engine compartment, right by the engine lid hinge. Super easy access. Pictures coming later.
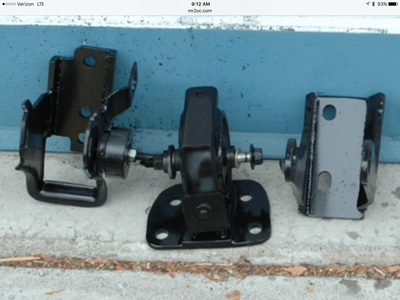
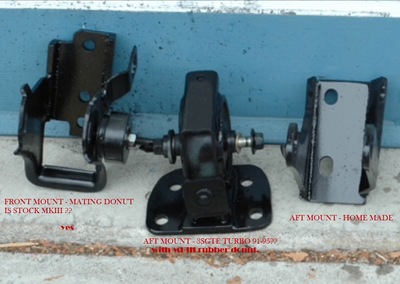
Engine Mounts -
Forward engine mount - 1/2 is stock spyder (the part that bolts to the bulkhead). The engine half is home-made.
RH engine mount - the 2GR block pieces are from Gouky. The rubber donut parts are from MR2 Mark II (SW20). I don’t think I have any good pictures. Pic of the installed mount is coming.
Aft engine mount - 1/2 is stock spyder (the part that bolts to the crossmember). The engine half is home-made. I’ll verify and post pics later.
Shift Linkage -
Home made using bits from MR2 Mk II and steel straps. It uses the stock spyder cables and cable-ends. I didn’t like the way it was done when I got the car, so I rebuilt the mounting structure myself. Poor pictures coming.
ECU -
Stock spyder ECU runs the body stuff (AC, lights, body computers etc), stock RAV4 ECU runs the engine. RAV4 ECU is mounted in the engine adjacent to the fan belt. Gouky’s 7200 rpm mod was a much needed improvement!
Axles -
Stock spyder LH axle. RH axle is from 2002-2007 Toyota Matrix P/N 43410-02280.
Cruise Control -
A free upgrade! RAV4 ECU with drive-by-wire throttle has cruise control built-in. Just add a cruise stalk and spiral cable (clock spring) from a SMT spyder, and run one additional wire back to the RAV4 ECU.
Radiator - stock spyder.
AC -
2011 Toyota Avalon AC compressor. Denso P/N 471-1612 Two aluminum fittings welded up, and crimped to new rubber flex lines to adjust the compressor’s new position to the spyder stock connectors under passenger seat.
Clutch -
Mk II clutch disc with a Turbo Mk II pressure plate. ACT disc P/N 2000605. ACT Pressure Plate P/N T023.
Coolant water -
When I got it, my car had a long corrugated rubber water line connecting the spyder tunnel line (hard line) to the water pump on the front of the engine. I replaced it with a 1.25 inch diameter home-made aluminum line. It carries water from the tunnel, down to the bottom of the firewall, where it picks up a stock Gates hose (formed rubber, smooth!). The Gates hose carries it up to the water pump inlet. Gates P/N 22922 (from Kia 4 cylinder automatic transmission).
For the heater hose coming off the back of the engine - I found a hose for GM Saturn that was the right shape. Gates P/N 21946 (from 1996 Saturn SC2 lower radiator hose)
Yes, I found these hoses by roaming the aisle at the autoparts store.
Clutch Slave Cylinder - Stock Spyder part.
Pictures of parts=======
Engine Mounts
Cross Member
Exhaust Manifold - Forward
This one was cut and spliced just above the cat, allowing fine tuning the final position of the exhaust mounting flange, and shortening up the overall height. The sharp corners aren’t too good for expansion/contraction without cracking, but it held together nicely for about 80,000 miles. Cracks were aggravated by the lack of any flex joints in the system.
Heater hose from a Saturn fits perfectly:
I make Amateur Armrests - see the Commercial Forum. I also have SMT repair seals available.
Was the cruise control stalk resistance correct for the 2GR? it's relatively simple for the MKII but all the resistors need to be changed in that one.
Was the cruise control stalk resistance correct for the 2GR? it's relatively simple for the MKII but all the resistors need to be changed in that one.
SMT stalk worked without any mods.
I make Amateur Armrests - see the Commercial Forum. I also have SMT repair seals available.
I added three videos, with a pretty thorough walk around above and below the car. If there are any details missing I’m happy to shoot more photos or videos. https://www.mr2-spyder.com/community/engine-swaps/2gr-home-built-swap-details/#post-5313
I make Amateur Armrests - see the Commercial Forum. I also have SMT repair seals available.
Nice, thank you for posting this. It's always nice to see how others do the swaps.
I think this also does a great job of outlining just how much of an overstuffed engine bay with this engine.
Sorry i did not have that body controller earlier, it would have made your instrument cluster cleaner 🙂
Overall the only thing i would really want to change if that was my car is the ground clearance. But it's one of those things that it's easier to throw new oil pans on it every once in a while at this point instead of completely remounting everything.
Also, for what it's worth, i have been changing my forum name away from Gouky to Marc or Frankenstein Motorworks wherever i can but using a phonetic alphabet you can see how it's intended to be pronounced here: ɡōkē (or just pronounce the word 'Go' then 'Key') there's a really really long and not really interesting reason behind that forum name. I started using it back in the early 90's before the internet was widespread. I was using it on old dial-up buletin boards 🙂
More photos of the crossmember before/after adding the box beam to restore it's strength.
I make Amateur Armrests - see the Commercial Forum. I also have SMT repair seals available.
Gouky's RH engine mount pieces:
Plus the home made piece to adapt it to the spyder frame...
I make Amateur Armrests - see the Commercial Forum. I also have SMT repair seals available.
Oil pan carnage:
I have about 3 inches clearance to the oil pan. It gets dings and scratches so I just replace it about every 40,000 miles or so. They're pretty malleable, I've never had one crack or leak.
I make Amateur Armrests - see the Commercial Forum. I also have SMT repair seals available.
Dipstick fix:
The stock 2GR dipstick tube is really short, about 4 inches long. I extended it with some flexible stainless steel housing. I shrunk a piece of heatshrink over the transition to keep the housing from moving and keep dirt out. Extended the dipstick cable by brazing on an extra length of cable (old motorcycle clutch cable). The stock spyder handle can be removed by squeezing the crimp connector to free the cable. Then crimp it back to reassemble.
I make Amateur Armrests - see the Commercial Forum. I also have SMT repair seals available.
Spark Plug and coil access door:
I used a piece of steel from Tractor Supply. I hammered it to match the contour of the shelf (which is not flat).
I make Amateur Armrests - see the Commercial Forum. I also have SMT repair seals available.
Radiator/coolant hard line:
I made this to carry coolant from the center tunnel, down and across to the front of the engine (RH side). There it clamps to a molded radiator hose that leads up to the water pump.
I make Amateur Armrests - see the Commercial Forum. I also have SMT repair seals available.
