Exactly what it says. I'm replacing my struts and i didn't buy pre assembled units. I.e. im reusing the springs.
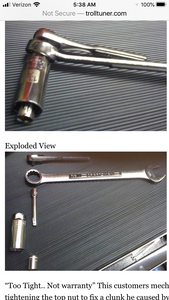
I'm having issues torqueing the top nut. I tried holding the top mount in my bench vise and torquing the nut but the shaft began turning. Your thinking, OK, the shaft is notched so you just didnt have the top mount pushed down all the way. Wrong. The center of the top mount was rotating as well fml. New top mount by the way. Having same issue with the old one.
Any ideas guys? Maybe i could do final torquing on car? I feel like that wouldn't help though.
Torque spec is 54 ft lbs or something like that. I could only get to about 20 before the spin show started.
Thanks
/* EDIT 06302020 1938EST
OK, update.
Rear struts:
Walked them to the mechanic down the street and he ugga duggaed them. He's a real bro. Always gets me in quick for random little stuff and usually has good advice. Id buy wipers from him just to say thanks lol.
Front Struts:
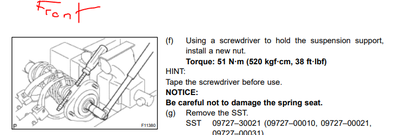
The metal plate below the top mount interlocks with the shaft. It is a solid piece without a floating center. Following the toyota service manual, i used a screwdriver to hold it in place and pushed down on the entire assembly while my friend torqued the top nut. Worked like a charm.
Side note:
I forgot to compress the spring before removing the top nut on a front strut. the nut and my breaker bar went flying, got a love tap in the jaw haha. The top mount stayed on the rod though. I guess the stock config doesnt compress the front spring too much.
Also, my front strut nuts were scary loose. Took almost no effort to start backing them off. As far as i know they have never been removed and were the originals. Check your top nuts on the front! I have a feeling that as the front mounts get worn out the torque lowers due to the material being previously compressed becoming thinner over time. Both my front mounts were very corroded and worn. Replaced with kyb fronts that had sealed bearings.
The metal plate under the top mount was covered in road salt. Wire brushed em and sprayed em with rustoleom rust converter. Look kind of good as new haha.
Rear mounts were def reusable, not to worn and rubber was still supple.
If anyone needs any kyb struts with 67k on them, let me know! I would be suspect about using the passenger side ones because i had a fun time with a pothole at 70 but they seem fine. Just pay shipping and like 10 bucks each or something.
Thanks for the help guys! Tbh i was kind of stressing about it. */
Uhhhhh I just ugga dugga'd that nut on there.
2000 Toyota MR2 Spyder, 2021 Lexus UX 250h F Sport
As stated above, use an impact gun. Replace unit(s)in car, hand tighten top nut. Then, in short bursts, final tighten. Not precise mechanics, but probably the best that can be done. Lord knows everyone has tried other methods (me included...).
OK, update.
Rear struts:
Walked them to the mechanic down the street and he ugga duggaed them. He's a real bro. Always gets me in quick for random little stuff and usually has good advice. Id buy wipers from him just to say thanks lol.
Front Struts:
The metal plate below the top mount interlocks with the shaft. It is a solid piece without a floating center. Following the toyota service manual, i used a screwdriver to hold it in place and pushed down on the entire assembly while my friend torqued the top nut. Worked like a charm.
Side note:
I forgot to compress the spring before removing the top nut on a front strut. the nut and my breaker bar went flying, got a love tap in the jaw haha. The top mount stayed on the rod though. I guess the stock config doesnt compress the front spring too much.
Also, my front strut nuts were scary loose. Took almost no effort to start backing them off. As far as i know they have never been removed and were the originals. Check your top nuts on the front! I have a feeling that as the front mounts get worn out the torque lowers due to the material being previously compressed becoming thinner over time. Both my front mounts were very corroded and worn. Replaced with kyb fronts that had sealed bearings.
The metal plate under the top mount was covered in road salt. Wire brushed em and sprayed em with rustoleom rust converter. Look kind of good as new haha.
Rear mounts were def reusable, not to worn and rubber was still supple.
If anyone needs any kyb struts with 67k on them, let me know! I would be suspect about using the passenger side ones because i had a fun time with a pothole at 70 but they seem fine. Just pay shipping and like 10 bucks each or something.
Thanks for the help guys! Tbh i was kind of stressing about it.
That tool doesnt look like it would work for our rear shock (KYB). There is no non round part on the top of the shaft to hold while tightening the nut. Also, a metal collar/bushing is under the nut so the entire shaft is sheathed. KYB website said there is a tool but i emailed them and no response so idk. Thanks tho
Rahat,
I am assuming you used a spring compressor to assemble the spring onto the strut. If so, you can use it again to grip on top of the mount and under the spring seat and compress slightly. The force from the spring compressor and the spring will hold the mount in place so you can torque the nut.
Alternatively, you would be fine to tighten the nut as much as possible, then torque once the part is installed on the vehicle and it is on the ground. That option may actually give you a more accurate torque.
Our parts are designed to match the Toyota torque spec of 54 ft. lbs.
Regards,
Technical Support
KYB Americas Corporation
I usually ugga dugga them too.
Side note: Ugga dugga may be OK for KYB and other replacement struts... But can cause problems with Koni inserts and other adjustable type damping. I've damaged a front pair of Koni inserts this way.
Side note: Ugga dugga may be OK for KYB and other replacement struts... But can cause problems with Koni inserts and other adjustable type damping. I've damaged a front pair of Koni inserts this way.
So does that mean 1 ugga dugga or 2?
I gave my KYBs two ugga duggas per side.
2000 Toyota MR2 Spyder, 2021 Lexus UX 250h F Sport

