Our ragtops are approaching 15-20 years old. Many folks are replacing them. Questions are popping up but we have no common terminology (without posting a picture every time).
Here is a starting point. I'll put some effort into maintaining post #1 so it will be useful in the future. Let me know if there are errors. If folks post helpful pictures, I'll copy them into post #1 to minimize rummaging in the future.
I included an uncommon word in the title, so if you remember to search on "anatomy", this thread should be on top.
The bow numbers are pretty much industry standard. I used "EZ On Tops" terminology for some of the other parts. For some of the other terminology, I just made stuff up.
Collection of all the anatomy pictures: LINK

SIDE QUARTER RETAINER
Sheetmetal bracket with a sliding pin. Installs in the back quarter on each side, just below the waist rail.
Below:
Proper routing of the strap and "pull tab" through the diverter frame.
Note, the tension of the zip tie (at the middle green arrow) is really important.
Mine needed to be so tight, the holes in each part were perfectly lined up.
If these parts are not routed correctly, or too loose, the side cables will fall outside the side rail "rain gutters" as you raise the top.
Very frustrating.
Below:
Bow 3 side cable spring
This spring is normally covered with a fabric "tube".
Reportedly, THIS is the spring that guides the side cable inside the side drip rails as you raise the top.
Below:
This diagonal strap attaches to the Side Quarter Retainer bracket, like this.
Below:
B Pillar Lower Bracket
This little metal clip holds the lower corner of the fabric tight, just aft of the B pillar, and just aft of the door opening.
Tip - install this bracket to the metal frame...with the top folded back. Duh. (It's really hard to do with the top in the up position!)
Below:
Doublesided tape to stick the listing flap to Bow #2, that worked well for me. At least it's designed to stick to fabric. Sort of expensive.
**update** This tape does not hold. The second time I stuck this flap down I used "DAP Weldwood Contact Cement". Which is permanent. The next person to replace the ragtop will hate you, but the DAP stuff sticks!
Alternatively, this HH-66 Cement should hold well without being too aggressive.
Below:
"Pull Tab" attaches to the side cable, then gets zip tied to a nylon strap at the Diverter.
Below:
EZ On Instruction book. Pretty minimal instructions, but enough helpful info to successfully install your own ragtop.

Below:
Convertible Top installation DVD
Pretty helpful, but I got more benefit from the EZ instruction book. It's easier to reference some printed instructions, than to keep running back to the television.
Note - I definitely did not agree with the one step in the author's procedure. He says to wrap and tape the Bow 2 listing flap (and the headliner) BEFORE stretching the fabric over the header. Yeah, that's just plain wrong! Stretching over the header bow is hard enough without having the fabric nailed down at bow #2. Plus, the tension you pull into the fabric between the header and bow #2 results entirely from how tight you can wrap the listing flap onto bow #2. You're going to get it much tighter if you have already hooked the fabric over the header, BEFORE you try to tape the listing to bow #2. If you don't get the fabric tight between the header and bow #2 - then your top will look all floppy and wrinkled when it's folded. That section of the convertible top is what remains visible. I'll try to snag a picture, because I didn't do mine right...and it's all floppy and wrinkled.

Below:
Package Tray strings should attach to bow #4

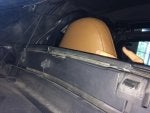
Side flap:
The side flap hides the bows, linkage and springs just aft of the door glass.
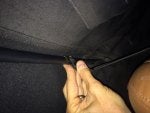
The flap hides all the metal frames except one - the inner most metal arm. The velcro loops around behind the diagonal strap, where it can grab the velcro pile on the exterior (outboard) surface of the diagonal strap. Pictures below are all taken of the driver's side.
The flap hides all the metal arms except this one.
The flap goes to the rear, wraps around the diagonal nylon strap, and velcro edge tucks between the strap and the ragtop fabric. The tip of my finger shows where the velcro pile is hidden.


