Hi all,
New hobbyist mechanic here, this little Spyder being my gateway drug. I'm sure some here can relate.
So, after weeks of review of the various pre-cat threads and the horrors of the Amigos I'm happy to report to you all that I conquered those 3 SOBs with (slightly)more blood than tears last night.
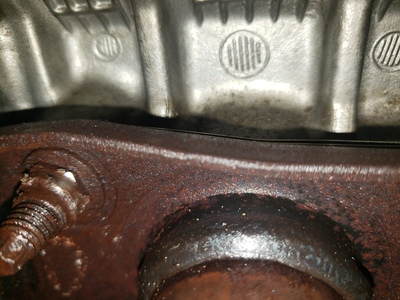
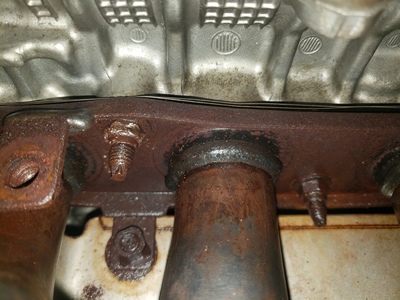
Things were looking up, way up, I even took a victory lap to the beer cooler(!)....then, picture attached rounded-off nut occurred 😲, and of course its on the least accessible stud.
So, youtube sleuth that I am I understand I may have a few options:
A- Attack the nut:
A1) Nut splitter? (From most I've seen online I don't think the clearance space around the nut exists to apply a splitter correctly?)
A2) Dremel cut the nut off? (Don't own a dremel, I imagine a medirum to high likelihood of damaging the stud threads or the stock header plate)
A3) Drill the nut? (same re: stud damage)
A2 & A3 are fine if that's the way it needs to be, I'm already mentally resigned to ordering new studs anyway.
B- Skip the nut, attack the stud:
B1) 2 nut stud removal trick. ( Is there enough thread purchase on the stud to get two nuts on it solidly with the OEM nut still on? Anyone do this successfully?)
B2) Stud remover ratchet tool (again, clearance space issue due to stock pipes, anyone have a set on the smaller side they can recommend that may fit?)
B3) Weld a washer/nut combo on the stud (not a welder)
B4) Cut the stud behind the rounded nut if all else fails, then drill and tap? (I don't want to do this.)
Realistically B3&B4 would mean finding a real man to do it for me, I'd like to avoid that if possible.
Looking for any feedback from you learned elders, if anyone has encountered this issue on this specific stud especially, or generally sage advice you may bestow.
Thanks, happy weekend to all.
I would get a torch on that stud and then have it removed as a first choice. Be very carful because if you go to far it will mean you will have to take it to a shop.
Hi Dev,
Thanks. So, perhaps a butante torch until it gets just cherry red? Then I imagine let it cool for a second then hit it with a stud remover ratchet? Sound about right or am I way off base?
Hi Dev,
Thanks. So, perhaps a butante torch until it gets just cherry red? Then I imagine let it cool for a second then hit it with a stud remover ratchet? Sound about right or am I way off base?
I think someone better than I can answer that. I never had to use a torch on any bolt before so I do not have that kind of experience but I know it works in situations like this.
Hi Dev,
Thanks. So, perhaps a butante torch until it gets just cherry red? Then I imagine let it cool for a second then hit it with a stud remover ratchet? Sound about right or am I way off base?
Don't let it cool , I like visegrips if you can reach it , try to keep the heat on the nut only , not sure what a stud remover ratchet is but you don't want to remove the stud .
Thanks, the thing is so rounded off and cornered in between the flange and pipes that vice grips are pretty hard to get any purchase with.
I will try but I'm assuming I will need to proceed to the dremel or drill option eventually.
If I can get the nut off without damaging the stud thread, should I go ahead and replace the studs with new one anyway for the sake of good order?
Provided no extraordinary breakage or hijinks are required for the stud removal it appears to be a pretty easy process to replace them once the nuts are off?
Do you see any value in that or are the rusty OEM studs still perfectly good? If using the rusty old ones should I apply a rust inhibitor or just wire brush them?
Thanks again
I actually prefer to grind one side of the nut off and they usually just peel right off but heat works too . I just wire brush the old studs and use anti-seize ...
purchased a set of carbide drills and a dremel with a cutting wheel at lunch and will proceed with the dirty business!
I would get the bit that fits the end of the stud, an impact and an extension as needed to reach, then heat the stud and attempt to impact off. PB blaster or similar>let sit>heat>impact>cool>repeat.
I would get the bit that fits the end of the stud, an impact and an extension as needed to reach, then heat the stud and attempt to impact off. PB blaster or similar>let sit>heat>impact>cool>repeat.
I removed a stud last year. That little torx bit end on the stud rounds off easy. What got it out was using the two nut trick. Basically tighten two nuts on the stud so they lock and then use a wrench on the inside nut and the stud will come out easy. Unfortunately this only works If you have removed the nut and have enough threads.
All,
For sake of good order, the final answer was: Butane torch, drill w/ metal bit, 1/4" chisel and hammer + 1 hour of elbow grease. Due to the piping arrangement and positioning of that top corner stud no mechanical advantage or purchase could be had with dremel/stud extractor/nut splitter or 2 nut trick etc etc.
At one point I thought I may have to surrender it to a shop but kept at it and finally was able to soften it enough for the drill to bite. The stud wasn't entirely broken during the ordeal but the threads were chewed pretty good.
After that all of the cylinder studs came out in less 10 minutes with the stud extractor ratchet attachment, badda bing badda boom.
Any of the other 4 cylinder studs would've fit a nut-splitter and it would've been a much easier issue.
Congrats. Its all downhill now.
As was stated above, make sure to use anti seize on the studs. Not regular anti seize, as this will not hold up to the heat for long. Use the copper based high heat stuff, available at most parts stores.
I assume you rounded off the nuts using a 12-point socket. For future reference, get a set of 6-point sockets and use them on difficult bolts and nuts.


